Category: Guitar Upgrades

  • Rescue Your Guitar’s Broken Truss Rod: A Pro’s Blueprint for Serious Hobbyists

    You reach for your truss rod wrench, but it just spins freely—or worse, gnaws away at a mangled, stripped nut that simply won’t budge.

    A close-up view of a stripped and damaged truss rod nut inside a guitar neck.

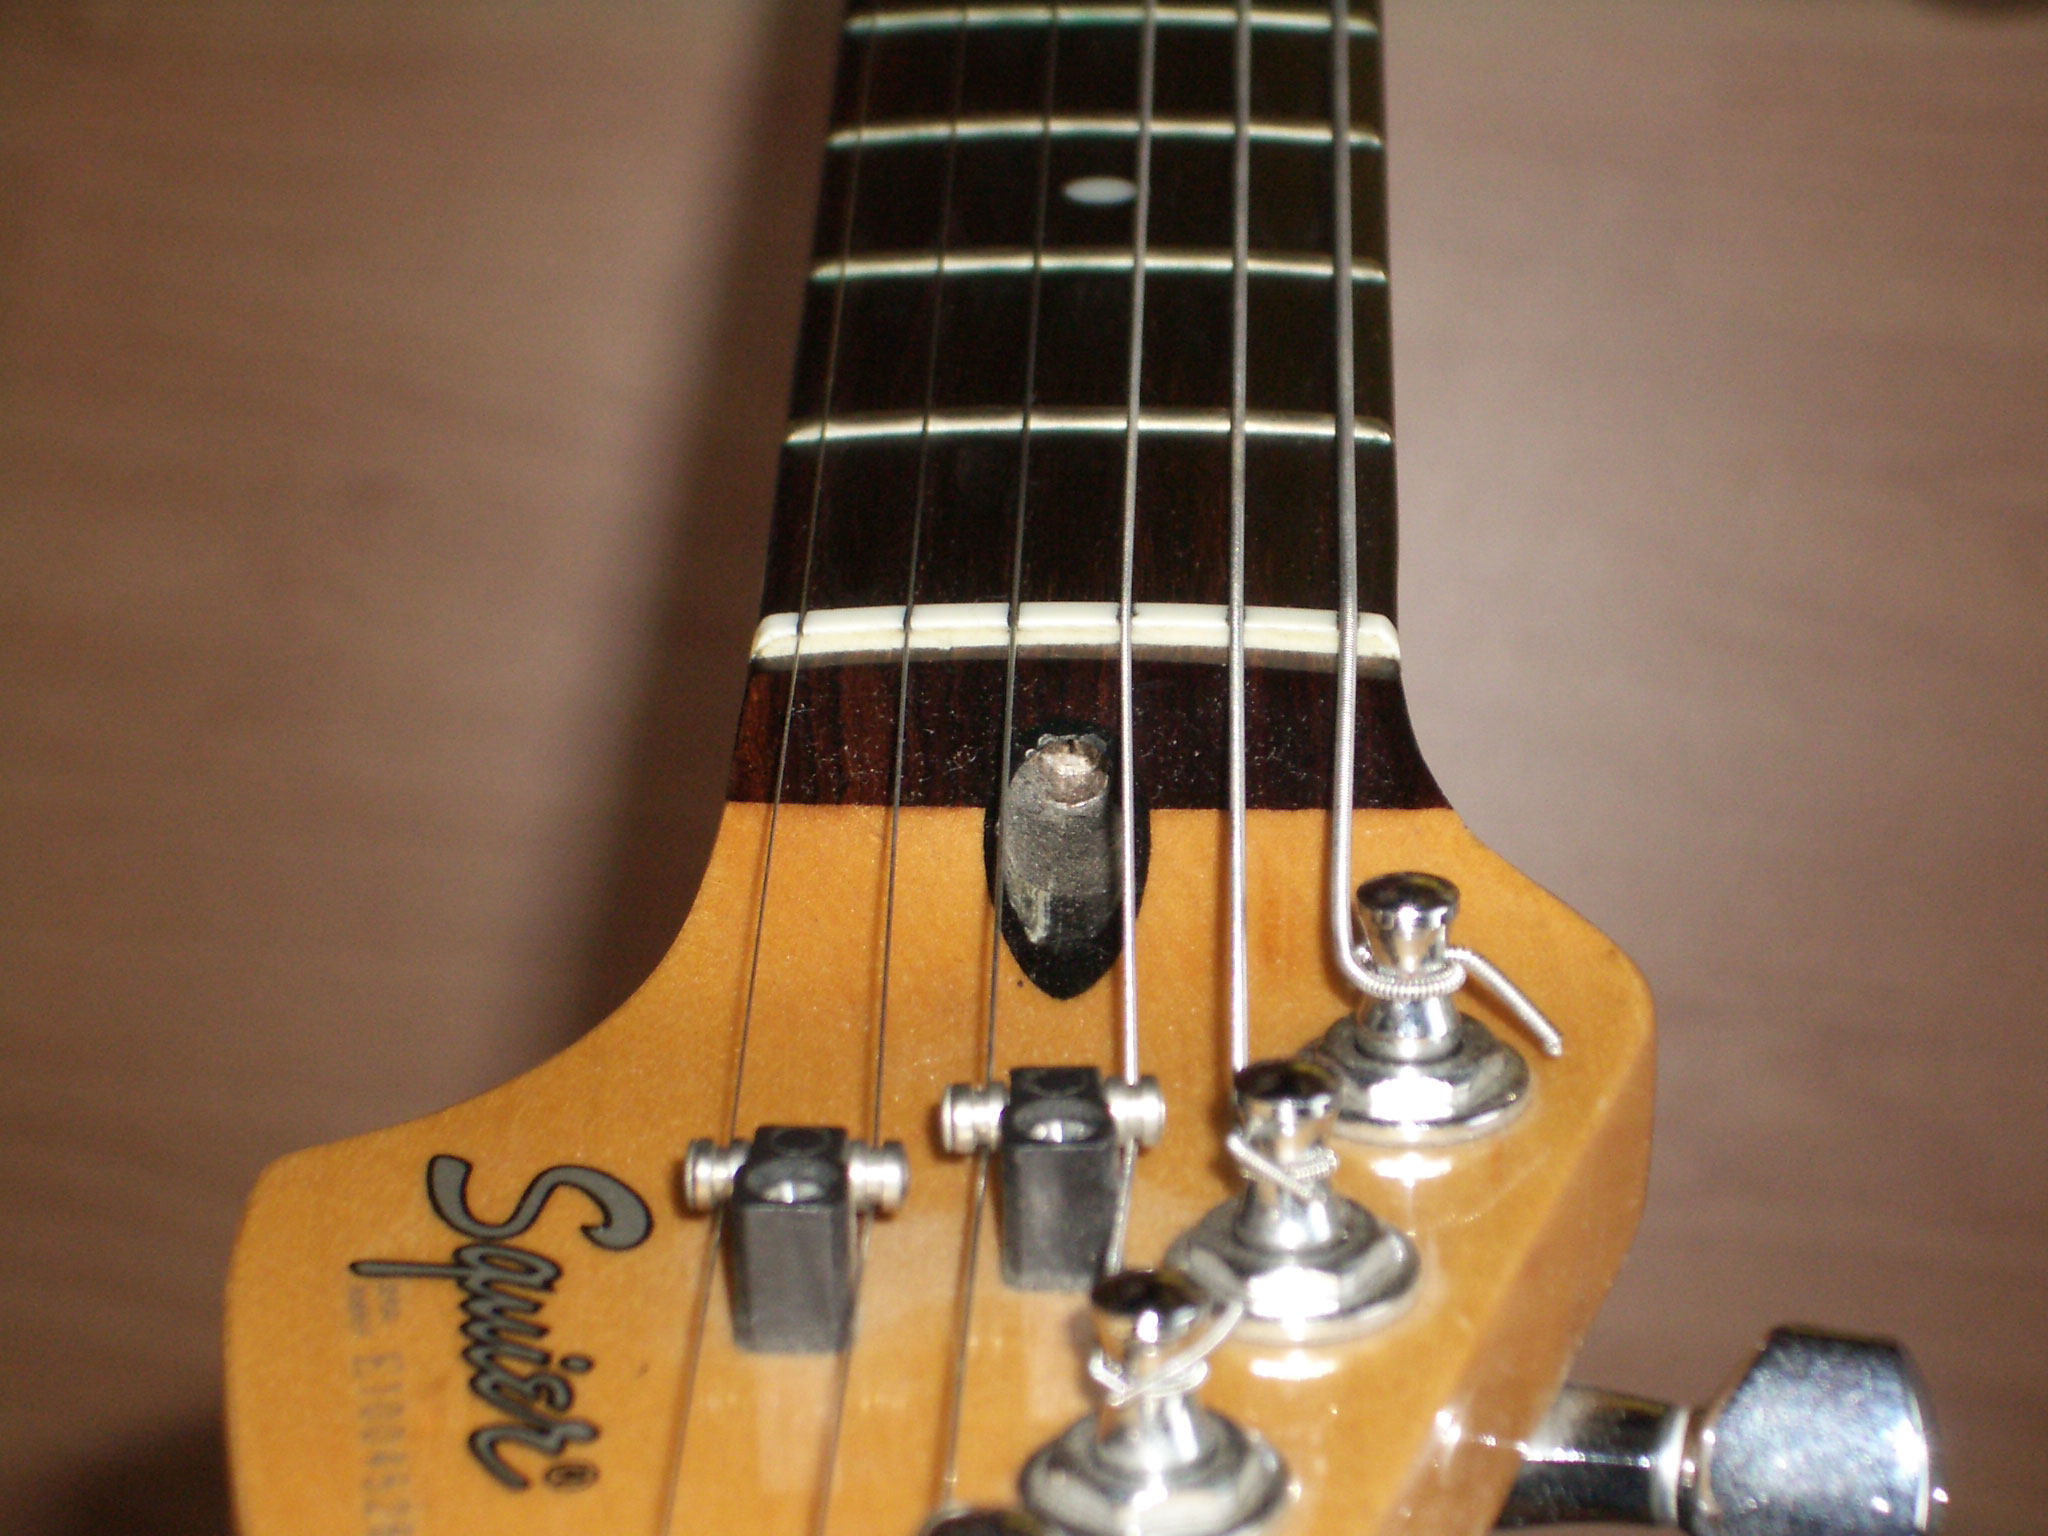
    Photo: Detlev Dördelmann (Wickler), CC BY-SA 2.0 DE, via Wikimedia Commons

    This isn’t just frustrating; it’s a critical injury to your guitar’s neck, compromising playability, action, and tone. For the dedicated instrument builder and serious hobbyist, a broken truss rod has historically meant complex, risky surgery—or the expense of a professional luthier. But what if you could fix it yourself, with professional precision, without the fear of irreversible damage?

    This guide taps into a master luthier’s insights, offering a pathway to repairing even severely damaged truss rods with game-changing specialized tools and techniques. What would typically be a “major drama” can be a surprisingly achievable fix. I’m like you, perhaps not a pro, but always striving for professional-level results. The key is to leverage the right tools and master a proven process, ensuring your skills aren’t held back by your equipment. Dan Erlewine, a titan in the lutherie world, recently demonstrated a repair that embodies this ethos, turning a daunting task into a manageable one.

    ▶️ The Master at Work: Fixing a Mangled Rod

    In this essential video, Dan Erlewine takes on a severely mangled truss rod, showing how he brings it back from the brink. His decades of experience are distilled into a clear, methodical approach that we can all learn from. Pay close attention to his steady hand and subtle insights—they are gold.

    🛠️ The Game-Changing Arsenal: StewMac’s Rescue Kit

    Before the existence of tools like these, repairing a damaged truss rod often meant dismantling a guitar’s neck—a truly daunting prospect.

    The brilliance of StewMac’s Truss Rod Rescue Tools lies in their ability to eliminate this “major surgery,” making the repair dramatically more accessible for us. It’s an investment that ensures you can achieve pro-level results, without the hassle of attempting complex, high-risk procedures.

    The core of the system is composed of two primary tools, along with crucial accessories:

    1. The 3/8-inch Cutter.
      This tool’s specific function is to bore away a minimal amount of wood around the damaged rod, precisely exposing unused or undamaged sections of the truss rod. It creates a clean pocket, allowing you access to the underlying problem without unnecessary material removal.
    2. The Thread Cutting Die.
      Once the cutter has opened access, this die fits perfectly into the newly created pocket. Its main purpose is to chase (clean up) mangled threads or cut entirely new threads on the truss rod, ensuring that a fresh adjusting nut can engage securely and properly.

    This ingenious two-part system is designed to remove the smallest amount of wood necessary, preserving the neck’s strength. You can acquire this essential kit here: StewMac Truss Rod Rescue Kit (Amazon).

    The StewMac Truss Rod Rescue Kit, showing the specialized cutter and thread die tools for guitar repair.

    🧰 The Fine Details: Tools & Techniques of a Master

    Mastering a repair isn’t just about the main tools; it’s about the nuances that separate an amateur job from a truly professional outcome. Dan’s process is full of them:

    1. Controlling Depth with Spacers.
      After cutting threads, it’s common to find the new nut doesn’t sit flush, making a truss rod cover impossible to install. Dan’s solution is the strategic use of thin **washers or “spacers.”** These polished metal pieces fit within the cutter’s cavity, allowing precise control over how deep the new adjusting nut sits. They also crucially provide a steel bearing surface for the nut, preventing it from crushing the wood of the neck. These vital parts are sold by StewMac and can typically be found on their main Truss Rod Rescue Tools & Parts page.
    2. Strategic Nut Selection.
      For depth issues, Dan demonstrates that sometimes a different type of nut is the answer. While longer Fender-style nuts offer more thread strength, he pivoted to a **Gibson-style acorn nut** because its smaller size allowed it to seat deeper into the neck, providing necessary clearance for a truss rod cover without requiring more wood removal from what is often a “weak area” of the neck. This thoughtful decision balances immediate solution with long-term structural integrity. You can find these essential Gibson-style nuts here: StewMac Truss Rod Adjusting Nut for Gibson (Amazon).
    3. No Lube for Adhesion.
      A testament to his foresight, Dan advises using minimal to no lubrication when cutting new threads with the die. His reasoning: “the less you use any lube the better chance you have for any kind of wood plug you want to glue in or whatever is happening.” This nuance ensures optimal adhesion for any potential future repairs or plugs, highlighting a comprehensive view of instrument integrity.
    4. The “Sleeve” Secret.
      Dan uses **blue masking tape wrapped around the truss rod** during installation, calling it a “sleeve.” This simple, unconventional trick prevents glue from sticking to the rod, ensuring it can function freely without binding—a detail that safeguards future adjustments.
    5. The Magnet “Trade Secret”.
      After using the 3/8″ cutter to expose the rod, Dan uses a simple **magnet to easily pull the cutter out** from the newly created pocket. It’s a small detail, but one that adds to the efficiency and reduces frustration during the process.

    ✨ The Critical Pro Step: Helping the Rod Adjust

    Perhaps Dan’s most emphasized and often “overlooked” technique is “helping the rod adjust.” He asserts that he “just don’t understand” why so many people omit it, as it’s vital for a successful, low-stress adjustment, especially post-repair. This method prevents the truss rod nut from doing all the work by himself and risking further damage:

    1. Loosen the Truss Rod Nut First.
      Always begin by completely loosening the truss rod nut.
    2. Backbow the Neck.
      This is the crucial step. You actively bend the neck into a slight backbow (reverse curve). Dan has evolved his methods over the years, from using his dad’s carpenter’s level to custom-made boards. Today, he often employs **3D-printed aids**, like specialized barbs that slide under the strings to create this controlled curve. (While it’s not confirmed these specific jigs are from them, resources like The Looth Group on Patreon are known for providing excellent 3D-printer files for similar professional-grade luthier jigs, showcasing this modern approach.)
    3. Tighten the Rod.
      Only *after* the neck is manually brought into a backbow do you then tighten the truss rod nut. This allows the rod to adjust into position with significantly less strain on the nut and its newly cut threads, greatly increasing the longevity and effectiveness of the repair. It essentially means “we’re taking all the tension off of the nut; we’re helping the rod along.”

    🏆 The Payoff: A Revived Instrument, Confident Hands

    The successful repair of a broken truss rod, once considered a catastrophic event, is now within reach for the serious hobbyist. Following Dan Erlewine’s methods and utilizing the right tools transforms a complex, high-risk job into a satisfying win.

    Your guitar neck will feel right again, the action will be dialed, and the satisfaction of performing a truly professional-level repair yourself is immeasurable. This empowers you not just to fix your instrument, but to become a better, more confident craftsman.

    Every luthier has a horror story about a broken truss rod. What single method or tool finally allowed you to conquer yours? Share your experience below.

  • Master Your Guitar’s String Spacing with Pro Precision

    You’ve replaced your worn-out nut, the string height is dialed in, but something still feels off.

    A professional close-up of a Gibson headstock, showing precise string spacing over the nut.

    Photo: Martin Hesketh from London, UK, CC BY 2.0, via Wikimedia Commons

    Perhaps your bass strings feel cramped, your fingers stumbling over each other on chords, or certain single-note runs feel surprisingly awkward. The real problem? Inaccurate string spacing. It’s a subtle but critical detail often overlooked in DIY setups, leading to what pros call “crowded bass strings” and that nagging feeling that your guitar isn’t playing as comfortably or “fast” as it could be. Look, as dedicated builders and serious hobbyists, our time and the quality of our work are everything. Sure, a master luthier can probably eyeball perfect proportional spacing after decades on the bench, but you shouldn’t have to. The path to doing more, quicker, and constantly improving applies here too. As I always say, I’m no pro, but I want pro tools so with my limited skills, I know at least the tools aren’t holding me back. True mastery is often about leveraging the right tools to get pro-level results **without the tedious repetition of trial and error.**

    📐 Pro String Spacing? Here’s How Dan Erlewine Simplifies It

    When it comes to string spacing, Dan Erlewine from StewMac is basically *the* guy. In this essential video, he walks through his proven method for getting perfectly aligned strings on a new bone nut. Sure, the know-how behind it took him years to nail, but he’s got it down to an art that’s now surprisingly straightforward for us to follow.

    📏 The Game-Changer: The StewMac String Spacing Rule

    For us, who aren’t trying to spend years developing Dan’s exact knack for eyeballing it, there’s a game-changing piece of gear. His accumulated mastery? It’s been built right into the StewMac String Spacing Rule (Amazon). This isn’t just any old rule; it automatically handles different string thicknesses. Unlike those basic methods that just put strings equal distance from center-to-center (which almost always gives you those frustratingly ‘crowded bass strings’), this rule has Dan’s proportional spacing baked right in. It means your strings will feel just right under your fingers – making complex chords and fast runs smooth and effortless. Honestly, it transforms a good setup into a genuinely professional-feeling instrument, quick as a flash.

    The StewMac String Spacing Rule, a precision tool designed to accurately mark guitar nut slots for ideal string alignment.

    🧰 Before You Start: The Nut Blank & Essential Tools

    Before you even grab the spacing rule, you’ll need your materials and tools lined up. For the best tone and classic feel, we always lean towards a quality bone nut blank. This StewMac Unbleached Bone Nut Blank for Fender (Amazon) is a great place to start. Just a heads up, bone can be a bit ‘slippery,’ so being super precise when you mark your slots is key. The rule helps with the layout, but when it comes to cutting those perfect, binding-free slots—the ones that truly make a difference—you really can’t skip on quality files. The StewMac Gauged Nut Slotting File Set for Electric Guitar, for Medium Strings (Amazon) are basically designed to eliminate guesswork, giving you clean, accurate slots that are crucial for a truly great setup.

    📝 Beyond the Tool: Nailing the Full Pro Process

    While the String Spacing Rule makes a massive difference, getting truly perfect results still means following a careful process:

    1. Set Your Boundaries First:
      This is critical. Get your high and low E strings on the nut with just enough tension to keep them in place. Nudge each one carefully so it’s sitting about 1/16th of an inch in from the fretboard edge. This is what keeps your strings from flying off while you play! Once they’re exactly where you want them, make a small mark and nick these points with a sharp file. That defines your overall string width.
    2. Let the Rule Work Its Magic:
      With those outer marks in place, grab your String Spacing Rule. Line it up against your nut blank and slide it until the rule’s six pre-marked spots line up perfectly with your outside E string marks. Suddenly, the rule tells you exactly where your inner four string slots need to go. No more guessing, no more complicated math.
    3. Mark with Precision:
      Dan’s got a couple of ways he likes to do this. You can simply “pencil in the other marks” right onto the bone through the rule’s slots, or if you’re feeling keen, you can directly “scribe the marks into the bone through these slots” with a sharp scribing tool. Either way, you’re transferring that perfect proportional spacing straight onto your nut, ready for filing.
    4. File Carefully:
      Now for the cutting. Using your precision nut slotting files, gently work each slot down to the right depth at those newly marked points. Remember, bone is notoriously slippery, so take your time and file slowly and deliberately. This is where you keep your spacing spot-on and avoid any nasty slips.

    ✨ The Payoff: Effortless Playability & That ‘Pro’ Feeling

    Plug in, fret a chord, run a scale. The difference in feel is huge. Those strings will just fall perfectly under your fingers, chords will sound more open, and suddenly those complex licks feel super fluid. That satisfying feeling—of everything just *working* perfectly—is what happens when you nail details like proportional string spacing. It really does make you feel like a next-level pro in your craft. You’re taking a master’s insights, using the right tools, and seriously elevating your own work, producing a result you can genuinely sleep at night knowing is absolutely spot-on.

    The line between ‘correct’ and ‘comfortable’ string spacing is personal. What method or discovery made it finally feel right for you? Join the conversation below.

  • Is Your Guitar Nut the Bottleneck to Perfect Tone?

    You look down at your guitar’s nut and it’s a chaotic landscape.

    A close-up view of a poorly-cut, damaged guitar nut, showing irregular string slots.

    Photo: TorrentFox at English Wikipedia, CC BY 2.5, via Wikimedia Commons

    The low E string swims side-to-side in its slot while the G-string binds and pings when you tune. Even worse, the high E has worn down so far it’s buzzing open against the first fret, killing notes completely. This isn’t just sloppy—it’s the physical bottleneck holding back your guitar from its true potential. The hard truth is that the stock nut on most guitars is compromising your tone, feel, and tuning stability. I’m not a professional luthier, and maybe you aren’t either. But I believe that we, the serious hobbyists, can achieve results that even pros would respect. The key is to follow a proven process and use the right tools—removing our own limited skill as a variable. This guide is the result of obsessive research, designed to be a blueprint for a professional-level upgrade, even for those of us still on the journey.

    📚 The Masterclass: Dan Erlewine Shows the Way

    Your time is your most valuable asset. So instead of reinventing the wheel, we’re going to look to a master for the solution. Dan Erlewine from StewMac walks through the essential technique for fitting a preshaped nut in this video. This is the fix. The principles he teaches are universal, authoritative, and the key to getting this job done right.

    🛠️ The Real Investment: Ensuring the Tools Aren’t Holding You Back

    As you saw, a pre-slotted nut gets you 90% of the way there, but perfecting that last 10%—filing the slots to the perfect depth—is what separates a good job from a great one. This is where a “buy once, cry once” investment is non-negotiable. I want pro tools so I know, with absolute certainty, that with my limited skill, at least the tools aren’t holding me back. The heart of any professional setup is a set of precision-gauged files. Investing in the StewMac Gauged Nut Slotting File Set for Electric Guitar, for Medium Strings – Set of 6 (Amazon) is an investment in certainty. These files are engineered to match specific string sizes, removing the guesswork and ensuring a clean, binding-free slot every time. It’s the difference between a hack job and a professional result.

    The StewMac Gauged Nut Slotting File Set, showing the set of 6 precision files for a professional nut job.

    To apply Dan’s flawless technique to the best available component, our recommendation is the StewMac Slotted Unbleached Bone Nut, for Fender (Amazon).

    ✅ The Professional’s Playbook: Four Details to Adopt for a Flawless Job

    With the right component and the right tools, the final step is to adopt the process of a professional. These are the details that matter.

    1. Protect the Investment First.
      Before a single file touches the guitar, a pro protects the finish. The method is a two-tape system: first, a layer of low-tack drafting tape directly on the finish, followed by a heavier-duty tape over it. Thank God for details like this—it can save an original finish from a disastrous slip.
    2. Use the Fretboard as the Jig.
      To ensure the nut’s bottom perfectly matches the fretboard radius, we can use Dan Erlewine’s elegant trick. Stick a piece of 80- or 120-grit sandpaper directly onto the fretboard (between the nut and the tuners) and gently sand the bottom of the nut against it. The fretboard itself becomes the perfect template.
    3. Think Like a Repairman, Not an Assembler.
      Most of us have reached for super glue. A pro thinks differently. The goal is a firm connection that is also serviceable. A few drops of shellac are all you need. It provides a solid bond but “will come apart easier if you want to take it out later.”
    4. Calibrate the System.
      Use a precision gauge like the StewMac String Action Gauge (Amazon) to perform the final and most critical step: the “balancing act.” The string height at the nut must work in harmony with the string radius at the bridge. This holistic view is the key to a setup that feels right across the entire neck.

    ✨ The Payoff: The Sound of a Job Done Right

    Plug it in. Strum a chord. The sound is clearer, the sustain is richer. The feel is consistent. But the real prize is the profound satisfaction of knowing you did it. You, the dedicated enthusiast, achieved a professional result because you followed a professional process.

    Every luthier has a story about a stubborn guitar nut. What’s yours? Join the discussion below.