You pick up your favorite guitar, and it just feels… off.
Photo: TT Zop, CC BY-SA 2.0, via Wikimedia Commons
You know the feeling. You’re lost. You tweak a saddle, play a chord, and try to remember what it felt like a minute ago. Was that better? Worse? You have no anchor point, no objective truth. You’re locked out of your own instrument’s potential, and it’s a uniquely sad and deflating feeling. You’re relying on guesswork—or worse, pocket change—and it’s a maddening cycle. But what if you could trade that guesswork for certainty, all for the price of a couple of packs of strings?
📚 The Master’s Tool for Objective Truth
Dan Erlewine doesn’t guess. He measures. In this essential video, he shows the simple, professional tool that ends the setup guessing game forever, and turns the “dark art” of a perfect setup into a repeatable science.
📏 Why It’s Not Just a Ruler
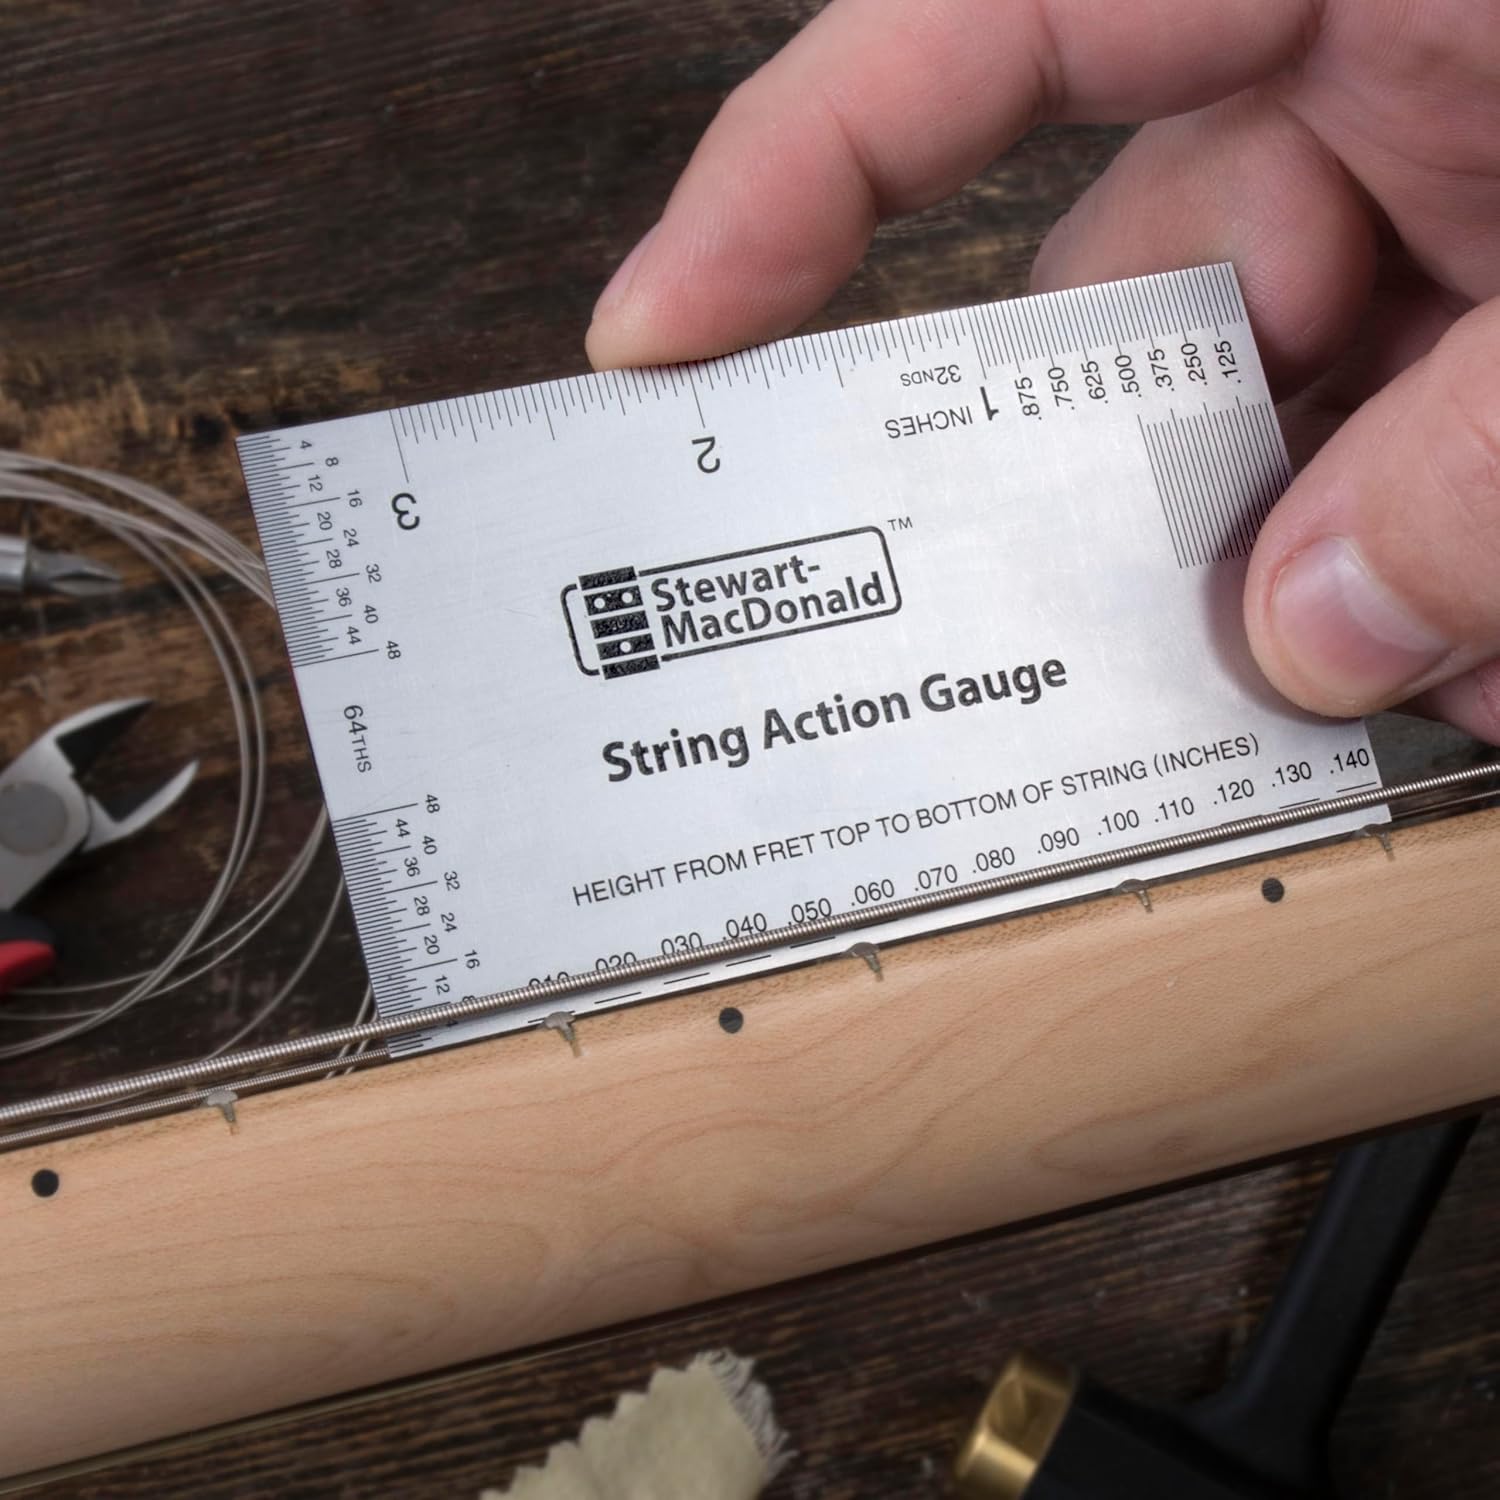
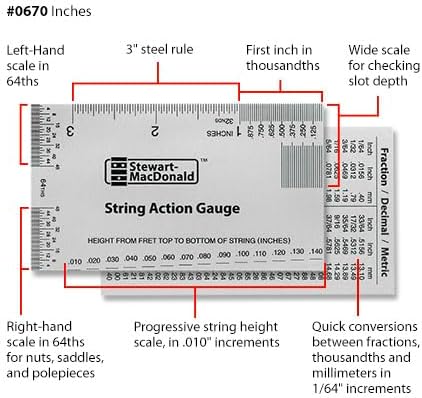
I used to try and use a standard 6-inch ruler for setups, and it was always a fight. The StewMac String Action Gauge is different by design, built by luthiers for this exact job.
It Eliminates the “Teeter-Totter”. A standard ruler balances on a single fret, making it wobble and “teeter-totter.” As Dan shows, this gauge rests across several frets, creating a stable, unshakeable base. This guarantees you get a true, square reading every time.
Precision You Can Actually Read. Forget thick, fuzzy millimeter markings. This gauge is marked in thousandths of an inch—the language of luthiers—with graduations for every 10,000th. The markings are etched and blackened, making them incredibly easy to read at a glance.
🛠️ The “Swiss Army Knife” for Your Bench
This is more than a one-trick pony. It’s a fundamental tool that quickly becomes indispensable for multiple jobs, adding immense value for its low cost.
Perfecting Pickup Balance: By pressing a string down at the last fret, you can use the gauge to accurately measure the distance to each pickup pole piece. This allows you to balance the output of your pickups for a smooth, even tone across all strings.
The “Save Your Settings” Trick: This is a pro-level move that prevents a huge headache. Before you remove a bridge for cleaning or repair, use the gauge to measure the height of the thumb wheels. Write it down. Now, you can reinstall the bridge, pre-set the height to your exact measurement, and avoid the “tune-detune-tweak” death loop.
The Handy 3-Inch Ruler: And yes, it’s also just a great little ruler, perfect for quick jobs like measuring bridge stud spacing or nut width.
💰 The Smartest Investment on Your Bench
As an aspiring luthier, I can tell you this is one of a handful of truly essential tools. It’s foundational equipment, serving both the beginner doing their first string change and the semi-pro looking for consistency. Championing a low-cost, high-ROI tool like this is a no-brainer. It signals that we’re here to help you build our skills from the ground up, not just sell you expensive gear. This tool is the true starting point.
✨ The Payoff: The Power of Knowing Your Numbers
The first time you use this gauge to dial in a perfect .060″ action, a door opens in your mind. You feel useful. Something that seemed hard was actually simple. Those Fender or Gibson specs you used to see online? They were just vague numbers before. Now, they are a recipe you can follow. This cheap tool gives you the superpower of **replication and restoration**. You can now decode the “magic numbers” from your favorite guitar and clone that perfect feel onto any other instrument. You have the power of a pro, and you got it for less than the cost of a new pedal.
What are your ‘magic numbers’? Share your go-to action height at the 12th fret in the comments below!
It’s the luthier’s scarlet letter: a bad binding job.
Those ugly gaps and uneven lines are more than a simple mistake; they’re a very visible, permanent scar. For a builder, it reflects a shortcoming—not enough experience, a bad method, or a simple slip. But the real devastation is the timing. It’s a failure at the finish line. After you’ve poured countless hours into a million perfect little steps to get to that point, a flawed binding job is utterly heartbreaking. It all traces back to a hidden, geometric problem: the non-square channel caused by a router tilting on an angled guitar back.
📚 Dan Erlewine’s Elegant Solution
This is precisely the kind of high-stakes problem Dan Erlewine excels at solving. He didn’t just accept this frustration; he engineered an elegant solution that de-risks one of lutherie’s most nerve-wracking tasks. Watch how he makes a complex problem simple.
💡 The Genius of Staying Square
The beauty of the TrueChannel Jig is that it solves a complex problem with an almost obvious mechanical principle. It “takes away the human mechanical variables,” transforming a high-wire act into a guided, repeatable process. As Dan shows, the jig simply rides along the top edge of the instrument, using it as a stable guide. This single point of contact forces the router bit to remain perfectly square to the sides, regardless of the back’s radius. The result? A perfect, 90-degree channel, every single time.
⚙️ A Closer Look: The Engineering of Precision
For a high-ticket item, understanding the mechanics is key. Let’s break down the two critical adjustments that make this jig so effective and versatile.
Dialing in the Height. Guitars have different body depths and binding comes in different heights. The jig accounts for this with a simple and robust height adjustment. The entire router mount slides up and down on the main vertical tower, allowing you to precisely position the router bit exactly where you need it on the guitar’s side. This ensures your binding channel is perfectly centered and consistent all the way around the body.
Controlling the Depth with Bearings. While the jig keeps the cut square, the depth of the channel is controlled by the bearing on your router bit. This is why using a dedicated Binding Router Bit Set is so important. By swapping out the bearings, you can precisely set how deep the bit cuts into the wood, allowing you to create stepped channels for multi-layered bindings with absolute precision. The jig handles the X-axis (squareness), the bearings handle the Y-axis (depth).
🎸 Beyond Acoustics: A Tool for Your Entire Fleet
For a builder like me—an “intelligent hack” who is learning—the goal is to build smart systems. This jig isn’t just for one type of guitar; it’s a “one system to rule them all” for binding jobs. It works flawlessly on carve tops, flat tops, and just about anything that has binding. This versatility means you don’t need a drawer full of different ad-hoc solutions. You master one perfect, universal workflow, which is satisfying and unlocks the ability to confidently take on work for customers, not just personal projects.
💰 The Investment in Flawless Lines
Let’s be honest: taking a high-speed router to the edge of a nearly finished instrument is terrifying. This jig acts as a “confidence multiplier.” It doesn’t ask you to be a robot; it provides a safety net that lets you leverage the speed of a power tool without the risk of a project-ending mistake. It’s a strategic investment in a guaranteed, professional-level outcome.
You’re buying your way out of a skill gap, which is the smartest move a craftsman can make. The core of the system is the StewMac TrueChannel Binding Routing Jig. (Note: This is a pro tool and can sometimes be out of stock, but it’s the one to get). Of course, the jig is only half the equation. You’ll need the right bits to make the cut, and the StewMac Binding Router Bit Set is engineered to work perfectly with it.
✨ The Payoff: “Glad I Called That Guy”
When the binding is glued, scraped flush, and that first coat of finish makes the seam disappear into a single, perfect line, the feeling is incredible. It’s that “Billy Madison” moment where you look at the perfect result and think, “Glad I called that guy.”
You outsourced the risk to the right tool. From that moment, you feel the excitement that you CAN and WILL build more guitars and get this critical step right, every time. You’ve proven you can identify a high-stress “mini job” and apply a targeted solution to reduce its stress to zero. That’s the win.
What’s the one binding ‘trick’ or tool that saved a project for you? Share your wisdom below.
This is it: the glorious, rock-solid monster that anchors your entire workshop and changes the game forever.
It puts a decisive end to the familiar, frustrating reality for so many of us: that slight wobble you try to ignore, the cluttered benchtop that forces you into awkward angles, the constant, low-level fear that one slip could turn a precise job into a disaster. Every stroke matters with a file, and if the very foundation holding your work is moving, your accuracy suffers. The noise, the feel… it’s enough to drive you mad. This isn’t just an inconvenience; it’s a corrosive agent that fundamentally undermines your confidence and focus. You’re fighting your environment instead of mastering your craft.
📚 The Master’s Vision for a Flawless Workflow
To solve a foundational problem, we look to a master. Dan Erlewine didn’t just accept the limitations of a traditional workbench; he reimagined the very hub of the workshop. In this video, he lays out his thesis for why a dedicated, stable, and adaptable workstation is not a luxury, but an absolute necessity for professional-level work.
🏆 The Three Pillars of a Professional Foundation
The genius of the ShopStand lies in how it systematically dismantles the core problems of a hobbyist setup. It’s built on three pillars that create a truly professional foundation.
Reclaim Your Workshop (The Space-Saver). For a smaller shop, bench space is prime real estate. The ShopStand solves the “real estate crisis” by replacing a bulky, space-hogging bench with a tiny footprint. You no longer have to sacrifice half your workshop to permanently-stationed power tools; the ShopStand becomes a hot-swappable hub, maximizing every square foot.
The End of ‘Wobble-Induced’ Fear (The Stabilizer). Bolted directly to your floor, this heavy-duty, rock-steady column is the ultimate confidence booster. The constant, subconscious micro-corrections you make on a wobbly surface vanish. That fear of slipping is replaced by the profound stability needed for the most delicate and demanding tasks.
Bring the Work to You (The Ergonomic Hub). With a height adjustment range of 27″ to 36″, the ShopStand adapts to you, not the other way around. It eliminates the “shop floor shuffle” of bending and hauling tools. Even better, it unlocks 360-degree access, allowing you to move completely around the workpiece without bumping into a bench—a game-changer for shaping necks or buffing a body.
🛠️ The System in Action: From Fretwork to Final Polish
The “Aha!” moment comes when you realize this isn’t just a stand; it’s a modular system. A task that used to be a frustrating, multi-step “unclamp-flip-reclamp” dance suddenly becomes fluid and intuitive.
Precision Fret & Setup Work: With a neck jig locked into the Guitar Repair Vise, you can tip the instrument into the perfect playing position and orbit the work, inspecting every angle without breaking focus.
Effortless Nut & Saddle Shaping: As Dan demonstrates, you can clamp a belt sander into the Angle Vise, bringing the tool to the perfect height for comfortable, precise shaping.
Flawless Buffing: The stand’s rigidity makes it the “perfect buffing stand.” It provides the stable base needed to apply Dan’s “Gibson secret”—keeping the piece moving in a circular motion, like steering a car, to achieve a beautiful, streak-free finish.
💰 The Investment: Forging Your Workshop’s Central Hub
Let’s be direct: this is a serious tool at a serious price. You could probably try to build one yourself if you have a welder and time to burn on grinding, drilling, and painting. But that’s a fair bit of work that pulls you away from the actual craft of lutherie. The real argument for a “buy once, cry once” tool like this is about what you’re truly investing in.
This isn’t just an expense; it’s an investment in confidence. It’s the aesthetic and functional upgrade that professionalizes your space. It’s knowing that if it’s good enough for Dan Erlewine, it’s good enough for you. You can build your ultimate workstation starting with the cornerstone: the Erlewine ShopStand. And remember, StewMac often has “SAVE WITH THE SET!” bundles that package the stand with the essential vises for a better value.
✨ The Payoff: The Feeling of “The Real Deal”
After you bolt this to your floor and complete your first major job, the lasting feeling isn’t just satisfaction with the work. It’s an ascension. You’ve eliminated the amateur’s biggest variable—an unstable environment—and have earned the right to see yourself differently. Suddenly, you feel you can take on more complex jobs, to demand more precision from yourself. It’s the moment you stop feeling like a hobbyist and start thinking like a professional. You become the quasi-professional, and the path to becoming the real thing is finally clear.
What’s the one tool that transformed your workshop from a hobby space to a pro-level environment? Share your story below.
If you’re currently using a clunky, old woodworking vise with foam pads taped to the jaws to hold your precious guitar—stop.
Just stop. That improvised setup, that slight wobble you try to ignore, that nagging fear in the back of your mind every time you apply pressure is the single biggest unaddressed risk in your workshop. You’re one slip away from a damaged finish, a cracked neck, or worse. As a fellow serious hobbyist, I believe some tools aren’t just purchases; they are foundational decisions. A proper vise isn’t about convenience; it’s the heart of your workbench, the trusted hands that hold your instrument while you perform surgery. The goal is to build a setup so reliable that you can remove all doubt and focus entirely on your craft, knowing with certainty that the tool will not fail you.
🎦 The Master’s Viewpoint
To understand the professional standard, we look to the master, Dan Erlewine. In this video, he walks through why a specialized vise is so central to his workflow. It’s not just a holding device; it’s an enabling tool that makes complex jobs possible. His insights set the benchmark for why this tool is different.
🛠️ The Cornerstone Investment: Why This Vise is Essential
This isn’t just a vise; it’s a purpose-built system for lutherie. I can say with full certainty this is a cornerstone tool, because its design solves the exact problems guitar work presents. Three features make it non-negotiable for holding tapered, irregular shapes:
Independent Swiveling Jaws. They can tilt and adjust side-to-side, allowing them to perfectly match the tapered angle of a guitar neck without slipping.
360-Degree Jaw Rotation. Each jaw can be completely spun around and then locked, letting you find the absolute perfect grip for any job, from fretwork to body routing.
Frictionless Operation. A custom roller bearing ensures the vise glides open and shut smoothly, while the removable hand crank means it never snags your clothes or gets in the way during a delicate task.
Ultimately, it’s about absolute trust. Users describe it as a “game changer,” and after experiencing that rock-solid stability, you’ll understand why it’s worth every penny. This is the one you buy once. Find the latest version, which now includes protective neck inserts, here: StewMac Guitar Repair Vise (Amazon).
💰 Price vs. The Lifetime Promise
Let’s address the elephant in the room: the price. It’s a serious investment. You can find other “pattern maker” vises, some for slightly less. But here’s the crucial distinction: you’re not just buying a piece of steel, you’re investing in the StewMac ecosystem. If you wait for one of their frequent sales, you can get a great discount. But more importantly, if you ever have an issue, they will look after you. Their lifetime guarantee isn’t a marketing slogan; it’s an operational promise. That peace of mind, knowing the company stands behind the most critical tool on your bench, makes the upfront cost a long-term bargain.
✅ The Pro’s Tradecraft: Two Details for Perfect Use
Owning a pro tool is the first step; using it like a pro is the next. Here are two pieces of “insider knowledge” that make a difference.
The Safety Net Rule. Any pro will tell you that a moment of carelessness can lead to disaster. The biggest risk is loosening the jaws before you have a new grip, causing the neck to drop onto the vise’s metal rails. While the new version of this vise commendably includes foam “Neck Protectors,” you can add a “belt-and-suspenders” safety net with a simple, folded microfiber cloth draped underneath. It’s a zero-cost piece of tradecraft that provides total peace of mind.
The Mounting Choice. The vise offers two mounting heights depending on whether you install it on top of or under your workbench (for an 8″ or 9-3/4″ height). Take a moment to consider your primary working stance—sitting or standing—and choose the height that minimizes strain on your back during long sessions.
🏆 The Payoff: The Sound of Silence
The true prize of owning this vise isn’t what it does, but what it stops. It stops the doubt. It silences the fear. It eliminates the risk of your improvised setup failing at the worst possible moment. Plug in your guitar, and it sounds the same. But work on it, and the confidence you feel is a new kind of music. You achieved a professional result because you invested in a professional foundation.
The workbench isn’t complete until the right vise is bolted to it. Do you agree that this is the first cornerstone of any serious workshop? Join the discussion below.
You reach for your truss rod wrench, but it just spins freely—or worse, gnaws away at a mangled, stripped nut that simply won’t budge.
Photo: Detlev Dördelmann (Wickler), CC BY-SA 2.0 DE, via Wikimedia Commons
This isn’t just frustrating; it’s a critical injury to your guitar’s neck, compromising playability, action, and tone. For the dedicated instrument builder and serious hobbyist, a broken truss rod has historically meant complex, risky surgery—or the expense of a professional luthier. But what if you could fix it yourself, with professional precision, without the fear of irreversible damage?
This guide taps into a master luthier’s insights, offering a pathway to repairing even severely damaged truss rods with game-changing specialized tools and techniques. What would typically be a “major drama” can be a surprisingly achievable fix. I’m like you, perhaps not a pro, but always striving for professional-level results. The key is to leverage the right tools and master a proven process, ensuring your skills aren’t held back by your equipment. Dan Erlewine, a titan in the lutherie world, recently demonstrated a repair that embodies this ethos, turning a daunting task into a manageable one.
▶️ The Master at Work: Fixing a Mangled Rod
In this essential video, Dan Erlewine takes on a severely mangled truss rod, showing how he brings it back from the brink. His decades of experience are distilled into a clear, methodical approach that we can all learn from. Pay close attention to his steady hand and subtle insights—they are gold.
🛠️ The Game-Changing Arsenal: StewMac’s Rescue Kit
Before the existence of tools like these, repairing a damaged truss rod often meant dismantling a guitar’s neck—a truly daunting prospect.
The brilliance of StewMac’s Truss Rod Rescue Tools lies in their ability to eliminate this “major surgery,” making the repair dramatically more accessible for us. It’s an investment that ensures you can achieve pro-level results, without the hassle of attempting complex, high-risk procedures.
The core of the system is composed of two primary tools, along with crucial accessories:
The 3/8-inch Cutter. This tool’s specific function is to bore away a minimal amount of wood around the damaged rod, precisely exposing unused or undamaged sections of the truss rod. It creates a clean pocket, allowing you access to the underlying problem without unnecessary material removal.
The Thread Cutting Die. Once the cutter has opened access, this die fits perfectly into the newly created pocket. Its main purpose is to chase (clean up) mangled threads or cut entirely new threads on the truss rod, ensuring that a fresh adjusting nut can engage securely and properly.
This ingenious two-part system is designed to remove the smallest amount of wood necessary, preserving the neck’s strength. You can acquire this essential kit here: StewMac Truss Rod Rescue Kit (Amazon).
🧰 The Fine Details: Tools & Techniques of a Master
Mastering a repair isn’t just about the main tools; it’s about the nuances that separate an amateur job from a truly professional outcome. Dan’s process is full of them:
Controlling Depth with Spacers. After cutting threads, it’s common to find the new nut doesn’t sit flush, making a truss rod cover impossible to install. Dan’s solution is the strategic use of thin **washers or “spacers.”** These polished metal pieces fit within the cutter’s cavity, allowing precise control over how deep the new adjusting nut sits. They also crucially provide a steel bearing surface for the nut, preventing it from crushing the wood of the neck. These vital parts are sold by StewMac and can typically be found on their main Truss Rod Rescue Tools & Parts page.
Strategic Nut Selection. For depth issues, Dan demonstrates that sometimes a different type of nut is the answer. While longer Fender-style nuts offer more thread strength, he pivoted to a **Gibson-style acorn nut** because its smaller size allowed it to seat deeper into the neck, providing necessary clearance for a truss rod cover without requiring more wood removal from what is often a “weak area” of the neck. This thoughtful decision balances immediate solution with long-term structural integrity. You can find these essential Gibson-style nuts here: StewMac Truss Rod Adjusting Nut for Gibson (Amazon).
No Lube for Adhesion. A testament to his foresight, Dan advises using minimal to no lubrication when cutting new threads with the die. His reasoning: “the less you use any lube the better chance you have for any kind of wood plug you want to glue in or whatever is happening.” This nuance ensures optimal adhesion for any potential future repairs or plugs, highlighting a comprehensive view of instrument integrity.
The “Sleeve” Secret. Dan uses **blue masking tape wrapped around the truss rod** during installation, calling it a “sleeve.” This simple, unconventional trick prevents glue from sticking to the rod, ensuring it can function freely without binding—a detail that safeguards future adjustments.
The Magnet “Trade Secret”. After using the 3/8″ cutter to expose the rod, Dan uses a simple **magnet to easily pull the cutter out** from the newly created pocket. It’s a small detail, but one that adds to the efficiency and reduces frustration during the process.
✨ The Critical Pro Step: Helping the Rod Adjust
Perhaps Dan’s most emphasized and often “overlooked” technique is “helping the rod adjust.” He asserts that he “just don’t understand” why so many people omit it, as it’s vital for a successful, low-stress adjustment, especially post-repair. This method prevents the truss rod nut from doing all the work by himself and risking further damage:
Loosen the Truss Rod Nut First. Always begin by completely loosening the truss rod nut.
Backbow the Neck. This is the crucial step. You actively bend the neck into a slight backbow (reverse curve). Dan has evolved his methods over the years, from using his dad’s carpenter’s level to custom-made boards. Today, he often employs **3D-printed aids**, like specialized barbs that slide under the strings to create this controlled curve. (While it’s not confirmed these specific jigs are from them, resources like The Looth Group on Patreon are known for providing excellent 3D-printer files for similar professional-grade luthier jigs, showcasing this modern approach.)
Tighten the Rod. Only *after* the neck is manually brought into a backbow do you then tighten the truss rod nut. This allows the rod to adjust into position with significantly less strain on the nut and its newly cut threads, greatly increasing the longevity and effectiveness of the repair. It essentially means “we’re taking all the tension off of the nut; we’re helping the rod along.”
🏆 The Payoff: A Revived Instrument, Confident Hands
The successful repair of a broken truss rod, once considered a catastrophic event, is now within reach for the serious hobbyist. Following Dan Erlewine’s methods and utilizing the right tools transforms a complex, high-risk job into a satisfying win.
Your guitar neck will feel right again, the action will be dialed, and the satisfaction of performing a truly professional-level repair yourself is immeasurable. This empowers you not just to fix your instrument, but to become a better, more confident craftsman.
Every luthier has a horror story about a broken truss rod. What single method or tool finally allowed you to conquer yours? Share your experience below.